Introduction
This guide is for you if you need to extend mizer to meet the needs
of your research project. You will already have read the mizer model
description in vignette("model_description") and thus be
familiar with what mizer can do out of the box. You now want to
implement the extension or modification of the model required for your
research, and for that you need to dive into the internal workings of
mizer. This guide is meant to make that as easy as possible.
The first thing you should do, even before reading this guide, is to go to https://github.com/sizespectrum/mizer/issues and create a new “issue”” to share your ideas and plans with the mizer community. You may get back valuable feedback and advice. Another way to get in touch with the mizer community is via the size-spectrum modelling Google group.
Setting up working environment
In this section we describe how to set up your working environment to allow you to easily work with the mizer code. Much of it you may already have in place, so feel free to skip ahead.
Installing R, RStudio and Git
Mizer is compatible with R versions 3.1 and later. If you still need to install R, simply install the latest version. This guide was prepared with R version 4.5.2 (2025-10-31).
This guide assumes that you will be using RStudio to work with R. There is really no reason not to use RStudio and it makes a lot of things much easier. RStudio develops rapidly and adds useful features all the time and so it pays to upgrade to the latest version frequently. This guide was written with version 1.2.1268.
Mizer is developed using the version control system Git and the code is hosted on GitHub. To contribute to the mizer code, you need to have the Git software installed on your system. On most Linux machines it will be installed already, but on other platforms you need to install it. You do not need to install any GUI for git because RStudio has built-in support for git. A good place to learn about using Git and GitHub is this chapter in the guide by Hadley on R package development.
Forking mizer from GitHub
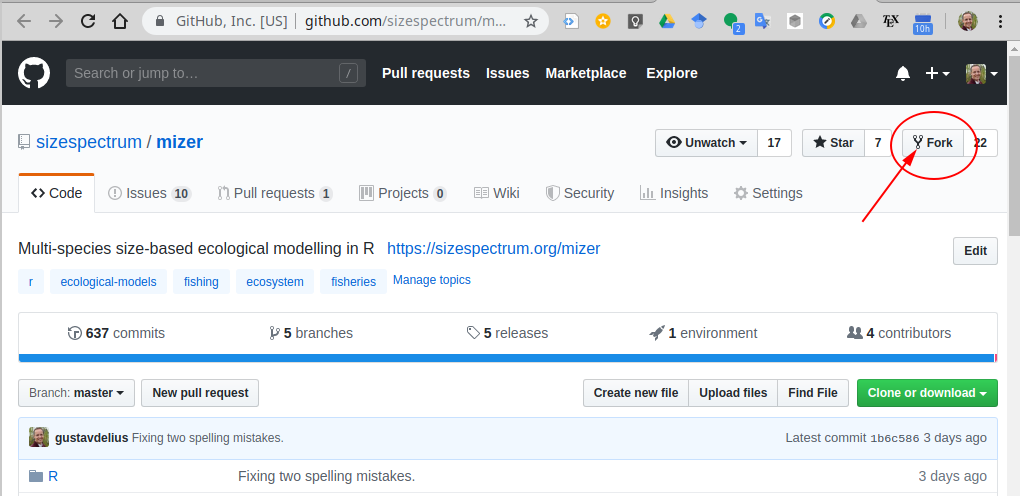
To work with the code you will create your own git repository with a copy of the mizer code. Go to https://github.com/sizespectrum/mizer and fork it into your own repository by clicking the “Fork” button.
You will be prompted to log in to GitHub. If you do not yet have an account, you need to create one for yourself.
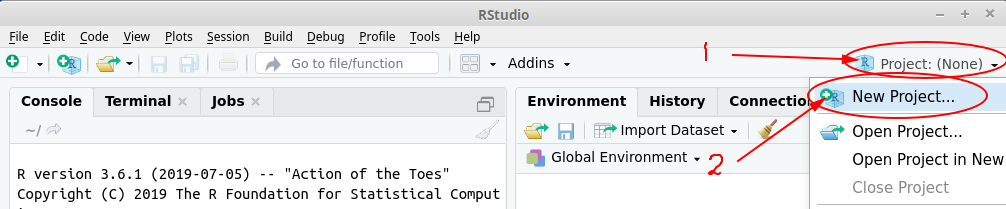
Once you have your own fork of the mizer repository, you create a local copy on whichever machine you work on. You can do this from within RStudio. For this you click on the “Project” drop-down and then select “New Project…”.
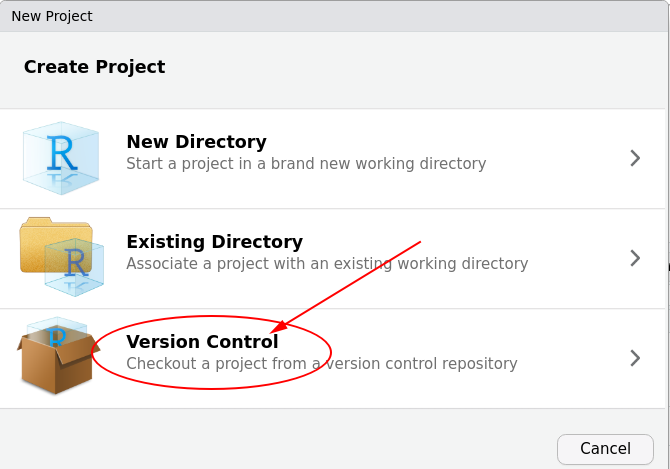
Provided you have Git installed and RStudio was able to find it you can then choose “Git” on the next dialog box.

If the Git option is not showing, the you need to troubleshoot, and perhaps https://happygitwithr.com/rstudio-see-git.html helps.
In the next dialog box you let RStudio know where to find your fork.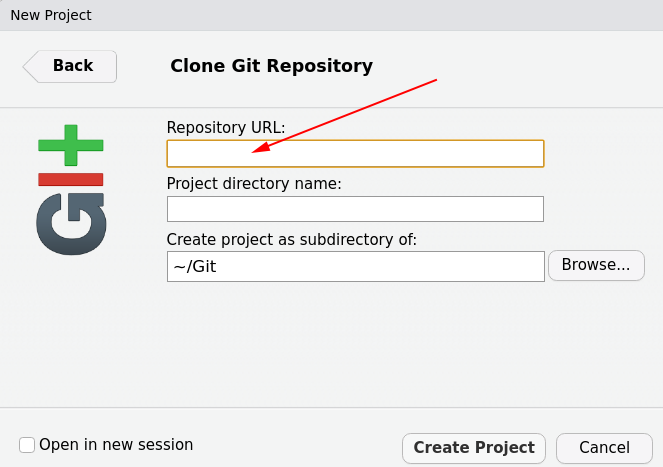
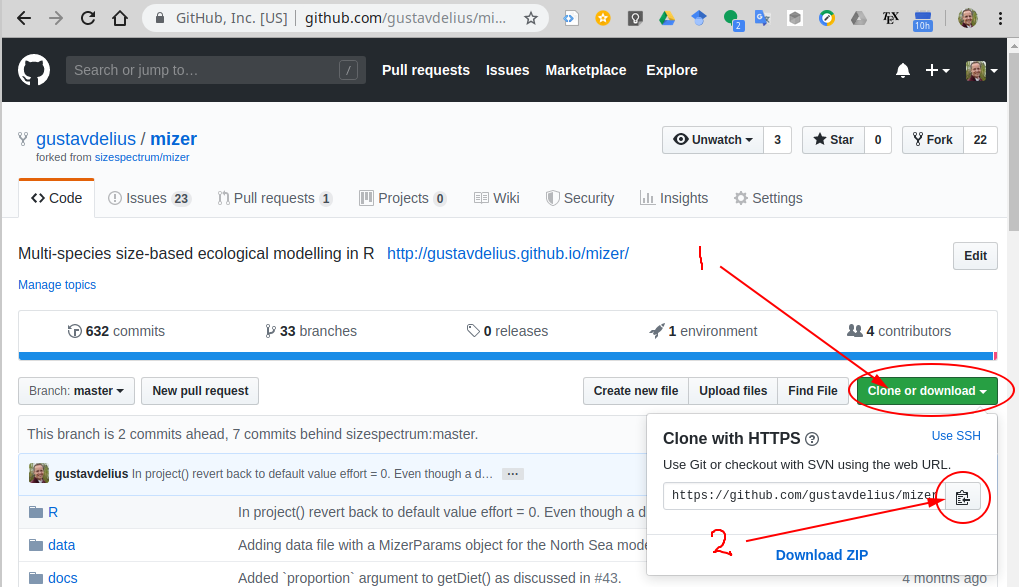
You can copy that to the clipboard by pressing the button next to the URL and then paste it back into the RStudio dialog box. In that dialog box you can also change where RStudio stores the repository on your machine. Choose anywhere convenient. Then click “Create Project”.
Setting up RStudio developer tools
To work with R packages as a developer, you will need to install additional tools.
Once you have these tools in place, you should install the devtools and roxygen2 packages with
install.packages(c("devtools", "roxygen2"))You are now all set to develop R packages, and RStudio makes this extra easy. There is even a cheat sheet “Package Development with devtools” accessible from the Help menu in RStudio.
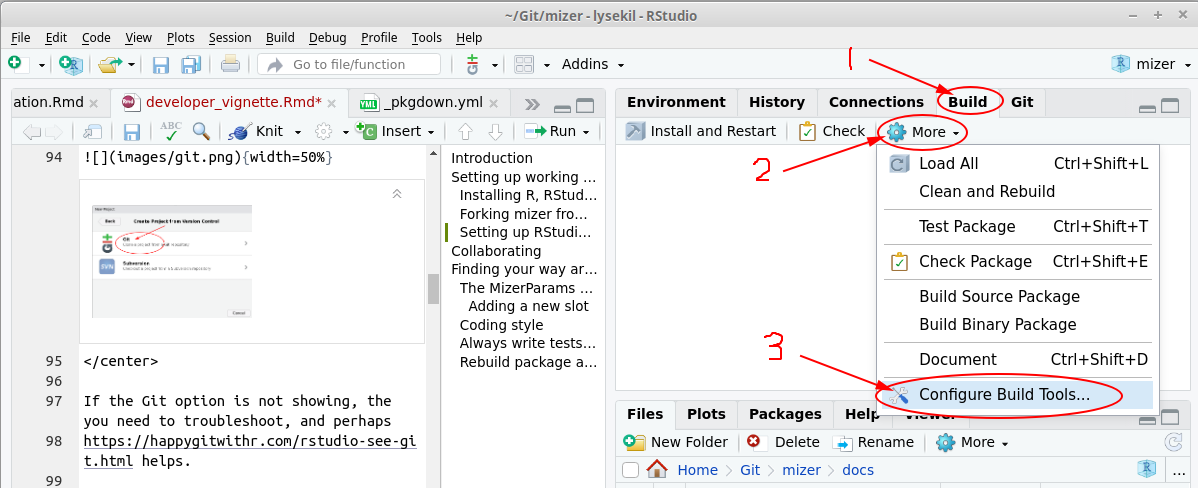
To set things up, click on Build -> More -> Configure Build Tools.
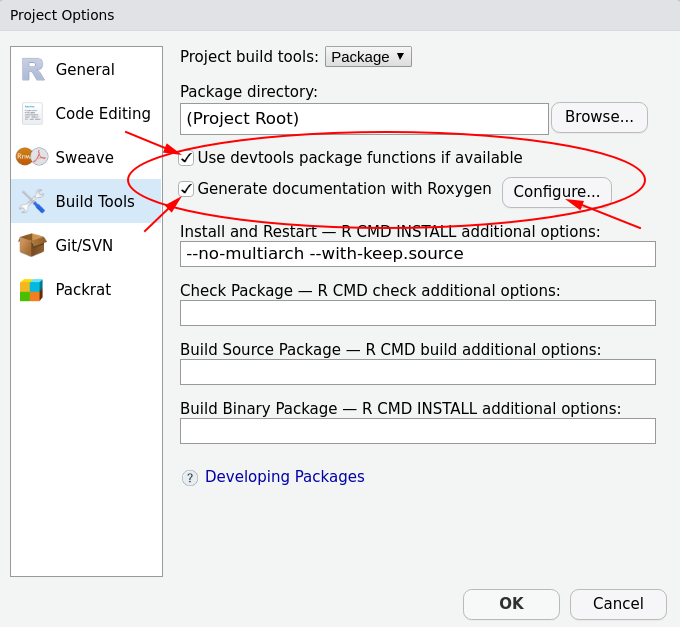
In the resulting dialog box, tick the checkboxes “Use devtools package functions if available” and “Generate documentation with roxygen” and then click on “Configure”.
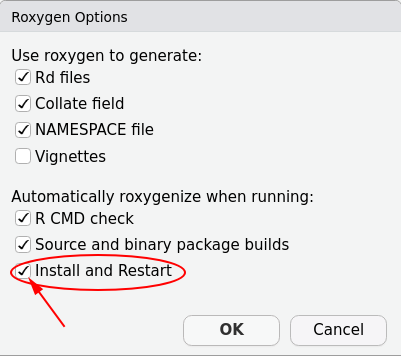
This will open another dialog box where you tick “Install and Restart”.
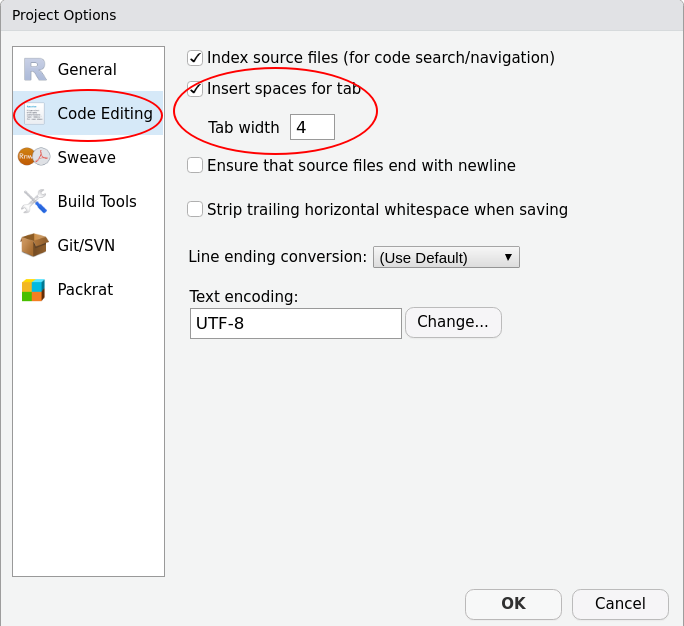
Hit “OK”. While you are on the Project Options dialog box, click on “Code Editing” and then check “Insert spaces for tabs” and set “Tab width” to 4, because that is the convention the mizer code follows.
usethis package
Many useful commands for working with packages and with GitHub are provided by the usethis package, which is automatically installed along with devtools. The package comes with a useful vignette with suggestions for how to set things up most conveniently.
Installing mizer
You are now ready to install the mizer package using the development code from GitHub. First you should do this with the command
devtools::install_github("sizespectrum/mizer")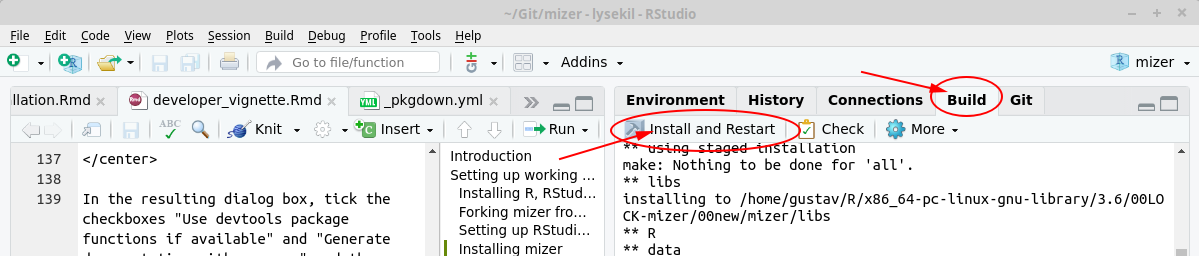
You can watch the progress in the “Build” tab. Once the build has completed, you will see that in the console RStudio automatically runs
to load you freshly built mizer package. You will want to click “Install and Restart” whenever you have changed your local code.
Working with git
You will be making your code changes in your fork of the mizer code (we are using the so-called Fork & Pull model). From time to time you will want to interact with the main mizer repository in two ways:
You will want to contribute some of your code back to the mizer project, so that it benefits others and also so that it gets automatically included in future releases.
You will want to be able to merge new developments made in mizer by others into your code base.
This interaction is made possible with git and GitHub.
It initially takes a bit of effort to get the hang of how this works. Therefore we have created a little tutorial “Working with git and GitHub” with an exercise that will take you through all the necessary steps. Unless you are already very familiar with git and GitHub, it will be worthwhile for you to work through that tutorial now.
Contributor guidelines
Always write tests for your code
We use testthat and shinytest.
The test are in the directory tests/testthat.
Some tests compare the results of calculations to the results the
code gave in the past, using the
testthat::expect_known_value() test. The past values are
stored in tests/testthat/values. If one of the tests gives a value that
is different from the stored value, then the test throws an error
and overwrites the stored value with the new result. The second
time the test is run, it then no longer fails. Luckily the original
values will still be in the git repository. So after you think you have
fixed the error that led to the wrong result, you should revert to the
old stored values before re-running the test. Reverting to the old
stored values is easy: Just go to the Git tab in RStudio, select the
changed files in tests/testthat/values (select, not tick),
then right-click and choose Revert.
It may be that the change in the result of a calculation is intended, perhaps because your new code is more accurate than the old code. If you are 100% certain of this, but only then, should you commit the changed files in tests/testthat/values, so that these new values form the basis of future comparison tests.
Plots are tested with the vdiffr package. When a plot has changed, you should run vdiffr::manage_cases(), which will start a shiny gadget where you can view the changes in the plot.
Finding your way around the mizer code
This section is still in an early stage of development.
Mizer is organised in a modular fashion. It is separated into setup functions, simulation functions, and analysis and plotting functions.
There are several different functions for setting up a
MizerParams object for specifying various concrete models.
These setup functions make various simplifying assumptions about the
model parameters to reduce the amount of information that needs to be
specified. This usually takes the form of assuming allometric scaling
laws.
The core of mizer is the project() function that runs a
simulation of the size-spectrum model. It takes a specification of the
model contained in an object of type MizerParams and
returns the results of the simulation in an object of type
MizerSim.
There are many functions for analysing and plotting the results of a
mizer simulation contained in a MizerSim object.
The MizerParams and MizerSim objects are S4
objects, meaning that their slots are rigorously defined and are
accessed with the ‘@’ notation. You do not need to learn about S4
classes in order to understand the mizer code, because the code avoids
using S4 methods. In the presentation below we assume that the
MizerParams object is called params and the
MizerSim object is called sim.
The MizerParams class
An object of class ‘MizerParams’ holds all the information needed for the ‘project()’ function to simulate a model.
Adding a new slot
If you need to add a new slot to the MizerParams class, you need to
make the following additions in the file
MizerParams-class.R:
- Go to the section “Class definition” and add a description of you new slot with @slot.
- Add an entry in the
slotslist insidesetClass. - In the function
emptyParams()go to the section “Make object” and inside the call tonew()provide a default value for your slot. If your slot holds an array, then it is conventional in mizer to already give it the correct dimensions and dimnames here, if possible.
What exactly to put into these places is usually clear in analogy to what is already there for other similar slots.
Condition handling system
Mizer should make good use of R’s condition handling system, which is
well described at https://adv-r.hadley.nz/conditions.html. Currently this
is being only in a small number of places in the code. Search the code
for signal() and withCallingHandlers() to find
those places.
Framework for informing users about defaults
Mizer’s strength is that it can choose default values for most parameters, so that the user needs to supply only very limited information to create a viable MizerParams object. The downside of that is that the user may rely on this too much and may not have enough information about the quality of the defaults.
Currently mizer issues some messages to the user when it calculates defaults. But this is minimal in order not to overload the user who does not need the extra information.
I would like the functions that calculate defaults to issue
information freely, and the wrapper functions around these to decide
what of this information should be shown to the user. Functions like
newMultispeciesParams() could get an extra
info_level argument that allows the user to control the
amount of information shown.
There will be a function to signal information:
info_about_default <- function(message, var, level) {
    signal(message, class = "info_about_default", var = var, level = level)
}
and functions like newMultispeciesParams() will get
extra code like the following:
# Define a signal handler that collects the information signals
# into the `infos` list.
infos <- list()
collect_info <- function(cnd) {
  if (cnd$level >= info_level) {
    infos[[cnd$var]] <<- cnd$message
  cnd_muffle(cnd) # So this info will not be repeated higher up
  }
}
# Register this signal handler
withCallingHandlers(
  info_about_default = collect_info

  # Here goes the existing code of the function

)
# Here goes some code to process the list `infos` to create
# a useful narrative for the user.
Defaults editions
The mizer functions for creating new models make a lot of choices for
default values for parameters that are not provided by the user.
Sometimes we find better ways to choose the defaults and update mizer
accordingly. When we do this, we will increase the edition number. The
mechanism is described in the help page of
defaults_edition().
We are currently on default edition 1.
To find which defaults are different in different editions simply
search for conditionals involving defaults_edition() in the
code.
Specialised topics
Size of git repo
We should try to avoid committing too many very large files to the git repository, because the larger the repository the longer it takes to download. Currently (September 2019) the repository is still at a manageable 110 MiB. The best way to check the size of the repository is with the git-sizer, see https://github.com/github/git-sizer/
We are currently storing the mizer website in the mizer repository (in the docs subdirectory). That is convenient, partly because that is where pkgdown puts it by default and GitHub serves it from there. However in the future we might consider moving the website to its own repository.