Introduction
It initially takes a bit of effort to get the hang of how this works. Therefore here we will take you through a little exercise that will see you create a feature branch, make a change to a mizer file, commit that file and push it to GitHub, and then make a pull request to contribute the change back to the core mizer code. The change that you will be making consists of adding your name to the list of people who have set up a fork of mizer.
We assume that you have set up your working environment and checked out your mizer fork to your local computer as described in the section Setting up working environment in the mizer developer guide. If you have not yet read that section, please do so now and follow all the instructions there before continuing with this tutorial.
Creating a branch
Initially you will be on the “master” branch of your repository. The code in this branch of your repository is a perfect copy of the code in the master branch of the main mizer repository at https://github.com/sizespectrum/mizer. You should always keep it that way and not commit any changes to this branch.
You should do all our development work in branches that have been branched off from the master branch. When you start working on a feature or on a bug fix, start a new branch with a name suggestive of the feature or fix. In this example, where you will be adding your info to the list of people who have set up a fork of mizer, let’s call the branch “add_my_info”.
To create the new branch, first make sure you have selected the master branch on the “Switch branch” dropdown in RStudio Git panel and then click the button to the left of that dropdown.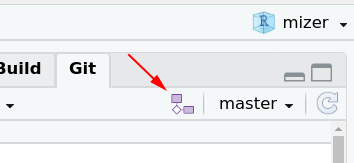
In the dialog box enter the name for your new branch: “add_my_info”. Leave the remote as “origin” and make sure the “Sync branch with remote” checkbox is ticked. This means that the new branch will be created not only on your local repository but also on your GitHub repository. Click “Create”. You are now on a new branch in your repository, but so far this branch contains only exactly the same content as the master branch that you have branched off from.
Editing a file
Next you will make an edit to a file. In the “Files” tab in RStudio, navigate to the “vignette” subdirectory and click on the name “developer_vignette.Rmd”. That will open that file in the Source editor pane. That file is the source file for this developer guide, written in R Markdown format.
A good way to navigate within files is to use the document outline which will be displayed when you hit the right-most icon on the editor pane toolbar.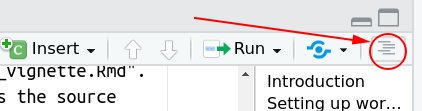
You will find the subheading “People with a mizer fork” towards the bottom of the outline. Clicking on it will move to the corresponding section of the file. You can now add another bullet point with your name and interests.
This is an R Markdown file, so you can compile it by clicking on the “Knit” button on the editor toolbar. This will also save your changes to the disk. After a short while the resulting html file will be displayed in an RStudio viewer which will allow you to check the formatting of your bullet point.
If you had made changes to the actual R code of mizer, then you would of course also rebuild mizer from that new code by clicking “Install and Restart” on the “Build” pane of RStudio to test it, and would in particular run the automated unit tests by hitting Ctrl+Shift+T.
Committing your changes
So far you have only saved your changes to your local disc, but have not yet committed it to your local repository. To do that you click on the “Commit” button on the toolbar in the “Git” pane in RStudio:
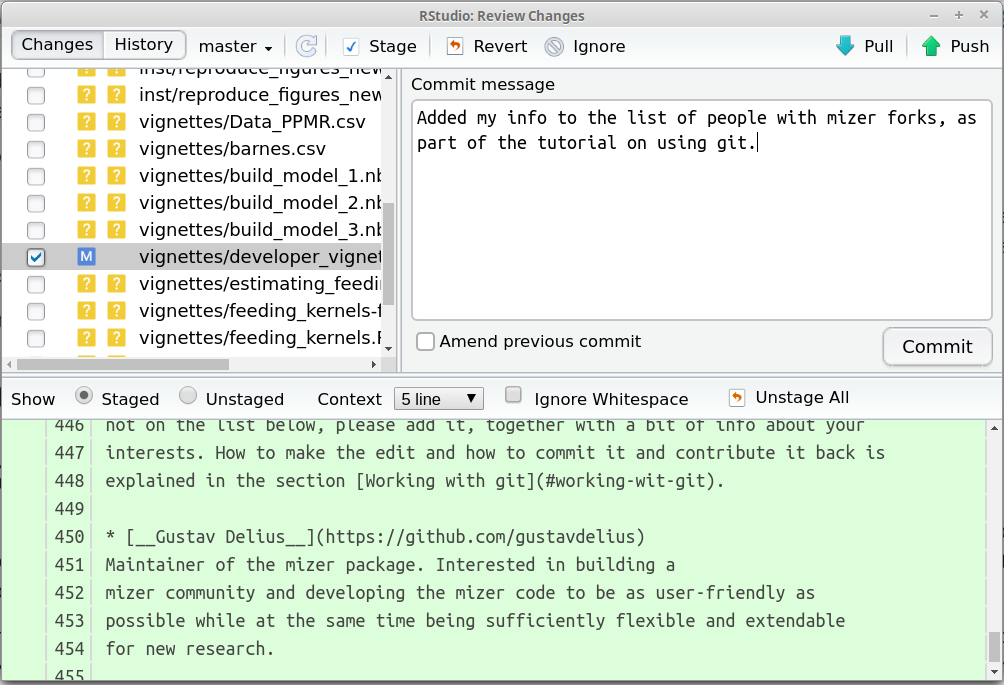
The blue M to the left of the file vignettes/developer_vignette.Rmd indicates that this file has been modified on your hard disc. The files with the question mark are files that are in the project directory but not part of the repository. You now tick the file that you want to commit to the repository. In the above screenshot the file vignettes/developer_vignette.Rmd has already been selected and as a consequence, the lower half of the pop-up window shows the modifications that have been made in the file. You should see your additions in green.
At the top right of the pop-up window you enter the commit message that will allow you and others later to understand the purpose of this commit. It is really useful to put a meaningful message here. The first time you make a commit to a new branch, you may want to write an extended commit message that explains what the new branch is for.
When you are happy with everything, hit the “Commit” button. Now your changes are forever saved in the history of your local repository.
Pushing and pulling
So far you have only committed your changes to the local repository on your computer. The changes have not yet been synchronised with your repository on GitHub. To do that, you click on the “Push” button on the toolbar of the “Git” pane, the one that looks like an up arrow. A window will pop up that will confirm if that push worked alright. You can then close that window.
After you have pushed your changes, you will be able to see them also on GitHub. If you go to the home page of your GitHub repository you will see a comment that you made a commit a little while ago: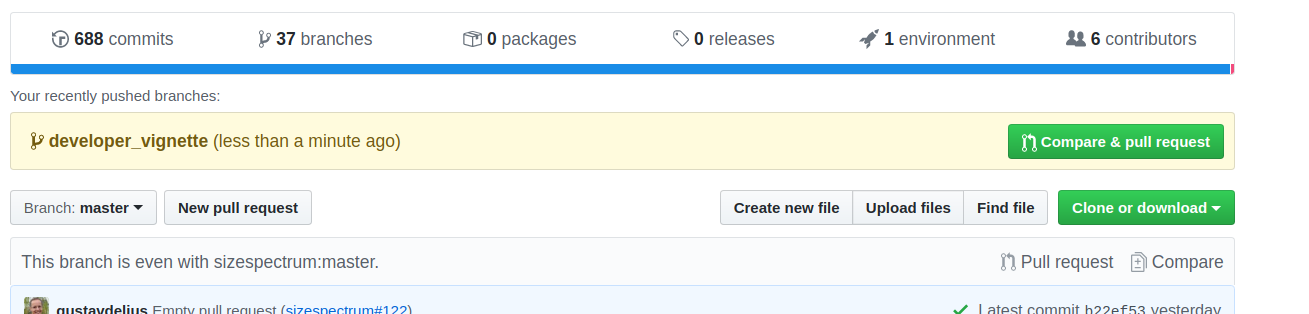
It may be that you have several computers on which you work an you can have a local repository on every one of them. In that scenario, it may be that you have pushed changes onto your GitHub repository from another computer. You will then not be able to push your new changes from your current computer until you have pulled those changes onto your current computer. You do that by hitting the “Pull” button that looks like a down arrow right next to the “Push” button. That will incorporate any changes from GitHub into your local repository and this will generally go smoothly. Only in the case where you have edited the same lines of the same file on different machines can you run into conflicts that git can not resolve automatically. In order to avoid such conflicts, you should pull and push frequently.
Making a pull request
Once a feature is developed and tested, you will want to merge it into the master branch of the upstream repository at https://github.com/sizespectrum/mizer. You can however not push your changes directly to that repository. Instead you create a GitHub pull request. This will then get a code review from another mizer developer before one of the developers with write access to the main repository merges your changes.
Due to this extra code review before any changes are integrated into the core mizer code, you do not have to be hesitant with making pull requests. In case there is anything wrong with your changes, you will get friendly feedback from other developers. You can then make more changes and commit them to the same branch and your pull request will automatically get updated.
The pull request is easy to create using the GitHub web interface:
- Go to the home page of your forked repository on GitHub
- Select the branch via the “Branch” drop-down.
- Click the “New pull request” button next to that drop-down.
Go ahead an create a pull request for your “add_my_info” branch.
Once your pull request has been reviewed and accepted by a developer and your changes have thus been merged into the upstream master branch, you can delete your development branch. There is a delete button on GitHub to delete a branch (for example on the page listing all your branches). You also need to delete the branch separately in your local repository by issuing
git branch -d add_my_infofrom the terminal, where `add_my_info’ is the name of the development branch. In addition you may want to tell your local repository that the remote branch has disappeared as well:
git remote prune originOtherwise it will stay in RStudio’s list of remote branches.
Merging from upstream
Once your pull request, or any pull request by anyone else with a mizer fork, has been merged into the upstream repository, the master branch in your fork is no longer in sync with the upstream master branch. So you will want to merge those upstream changes into our master branch. To do that you can use the “Terminal” pane in RStudio, where you execute the following git commands:
git fetch upstream
git checkout master
git merge upstream/master
Again, unless you locally changed the same line in the same file that someone else changed in the upstream repository, the merging will be automatic. You should then push the merged master branch back to your GitHub repository with the “Push” button.
If you get an error when attempting to fetch from upstream then the upstream repository may not yet have been set for your repository. You can check with
git remote -vIf that does not list an upstream, then execute the command
git remote add upstream https://github.com/sizespectrum/mizer.gitand then try the above again.
The first time you go through all the above steps, you will think that you will never grow to like git. What a lot of fuss. What a circuitous route for your change to make it into the master branch of your GitHub repository:
- from your editor to your
- from your harddrive into your development branch in your local repository via Commit
- from you local repository to your GitHub repository via Push
- from your GitHub repository to the main mizer repository via Pull Request
- from the main mizer repository to you local master branch via merge
- from your local master branch to the master branch of your GitHub repository via Push
But this is the best system software developers have come up with to allow many people to collaborate on the same code.
You may have more than one development branch because you may be working on several features at the same time or some of your features are still waiting to have their pull request merged. In that case, after merging the upstream changes into our master branch, you may also want to merge them from your master branch into some of your development branches. For that you just go to the development branch and do
git merge masterPeople with a mizer fork
Here we information about the people who have made a mizer fork. If your name is not on the list below, please add it, together with a bit of info about your interests. How to make the edit and how to commit it and contribute it back is explained in the section Working with git.
Gustav Delius Maintainer of the mizer package. Interested in building a mizer community and developing the mizer code to be as user-friendly as possible while at the same time being sufficiently flexible and extendable for new research.
Mariella Canales Interested in a multispecies size-based analysis for the pelagic fish community off Northern Chile.